Showing posts with label Christmas. Show all posts

Monday, October 19, 2015

Super Saturday Crafts

This is a really fun Super Saturday Craft project.  We textured the wood using a vinegar and steel wool process (Directions on our website) then applied this really cute Vinyl Design. Decorate it up a bit with a bow or leave it plain and it will become one of your favorite Christmas decorations. Vinyl is available on our website Vinyl Gifts and More.


BE SURE TO LIKE US ON FACEBOOK  www.facebook.com/vinylgiftsandmore

FOLLOW US ON PINTEREST   www.pinterest.com/vinylgiftsnmore

AND SIGN UP FOR OUR NEWSLETTER:  Newsletter

Friday, August 28, 2015

New Christmas Vinyl - Vinyl Crafts

Great for Super Saturday.  I LOVE Christmas! I get all excited about new Christmas vinyl.  We hope you like all the fun new vinyl graphics we are selling!


Monday, October 6, 2014

Great News for Jar Lanterns


Thanks to our wonderful customers, we got some new info on Jar Lanterns.  Normally people use the Frosted Spray in a can to coat the outside of the jars.  We have found that there can be some problems with the spray.  

If you handle your jars, the oils from your fingers can transfer to the jar. When you spray the jar, it looks covered but in fact, everywhere your fingers touched, the frosted spray can peel off when you apply the vinyl.  Our suggestion is to wash your jars in the dishwasher prior to using, then either wear gloves or only touch the jar from the lip of the jar.

Now we have found that you can use a different spray.  We used the Krylon Crystal Clear Flat spray, and it will gave a similar look as the frosted but is less temperamental.  We tried it putting our fingers all over the jar prior to spraying and it didn't peel off when the vinyl was applied.

We do not guarantee that this will work all of the time.  We do suggest that you use clean jars and that your hands are fairly clean also.  If you are planning to do a large number of these, please test one or two before you do them all.  By the way, the Flat spray was less expensive than the frosted!  

For more information on how to do these jars, CLICK HERE.  If you wish to order these (they do come in a variety of designs), CLICK HERE.  

Remember, these don't always have to be used as jar lanterns.  Try putting other things in your decorated jar - like candy or some other fun items.  These make great gifts for teachers, neighbors, grandparents, and that hard to gift boss!

If you have questions, please email us at vinylgiftsandmore@gmail.com.

Saturday, August 30, 2014

Away in the Manger Shadow Box


Come check out our new Christmas shadow box vinyl "Away in the Manger" on our website. Our "Jingle All the Way" shadow box has been such a huge hit, so we decided to come up with more designs.  Also I noticed this week (Aug 30, 2014) at Michaels they are having a sale on shadow boxes.  Buy one get one free. 

How to:
-(1) 8x8 shadow box
-raffia
-Vinyl from Vinylgiftsandmore.com
- Wood paper from a craft store or print out wood scrapbooking paper from the internet.
- Ribbon for embellishment. (optional)

1. Take the backing off the shadow box.
2. Fill the bottom with cut raffia.  My pieces were around 2 inches long.
3. Cut the wood paper to fit in the box for the background. 
4. Put the back cover back on the box.
5. Place the vinyl on the front of the box.  I placed my vinyl about an inch above the bottom so it looks like they are in the hay. 
6. Tie a bow around the box if desired. 

This is a simple and fun project to do.  Great for super Saturdays and other craft groups.  Also great to make for a gift!

Tuesday, July 22, 2014

Christmas Countdown "Christmas is Near Board" - NEW!!!

Here is an awesome new kit available on our website www.vinylgiftsandmore.com.  This "Christmas is Near" comes as a kit or vinyl only.  What a great idea for your family to keep track of the days until Christmas.  A fantastic Super Saturday project!

Find instructions on how to make this craft by clicking HERE.  Place your order on our website!

Please follow us on Facebook and Pinterest!

Saturday, October 5, 2013

Christmas Ornaments- A Great Family Project!

WOW!  The Christmas season is upon us if we are ready or not.  Everyone seems to be getting their Christmas crafts up and going.  We have done many jar lanterns lately but I have wanted to do the Christmas balls - the clear glass ones that you paint and decorate the way you want. 

The other day my cousin (in her 80's) and myself (in my mid 60's) tackled this project.  Now, I own this craft company (I am the computer-business person), but it is my daughter that makes our designs and creates the ideas that you see.  This really is not in my comfort zone and definitely not in my cousin's, but we were wanting to give it a try.

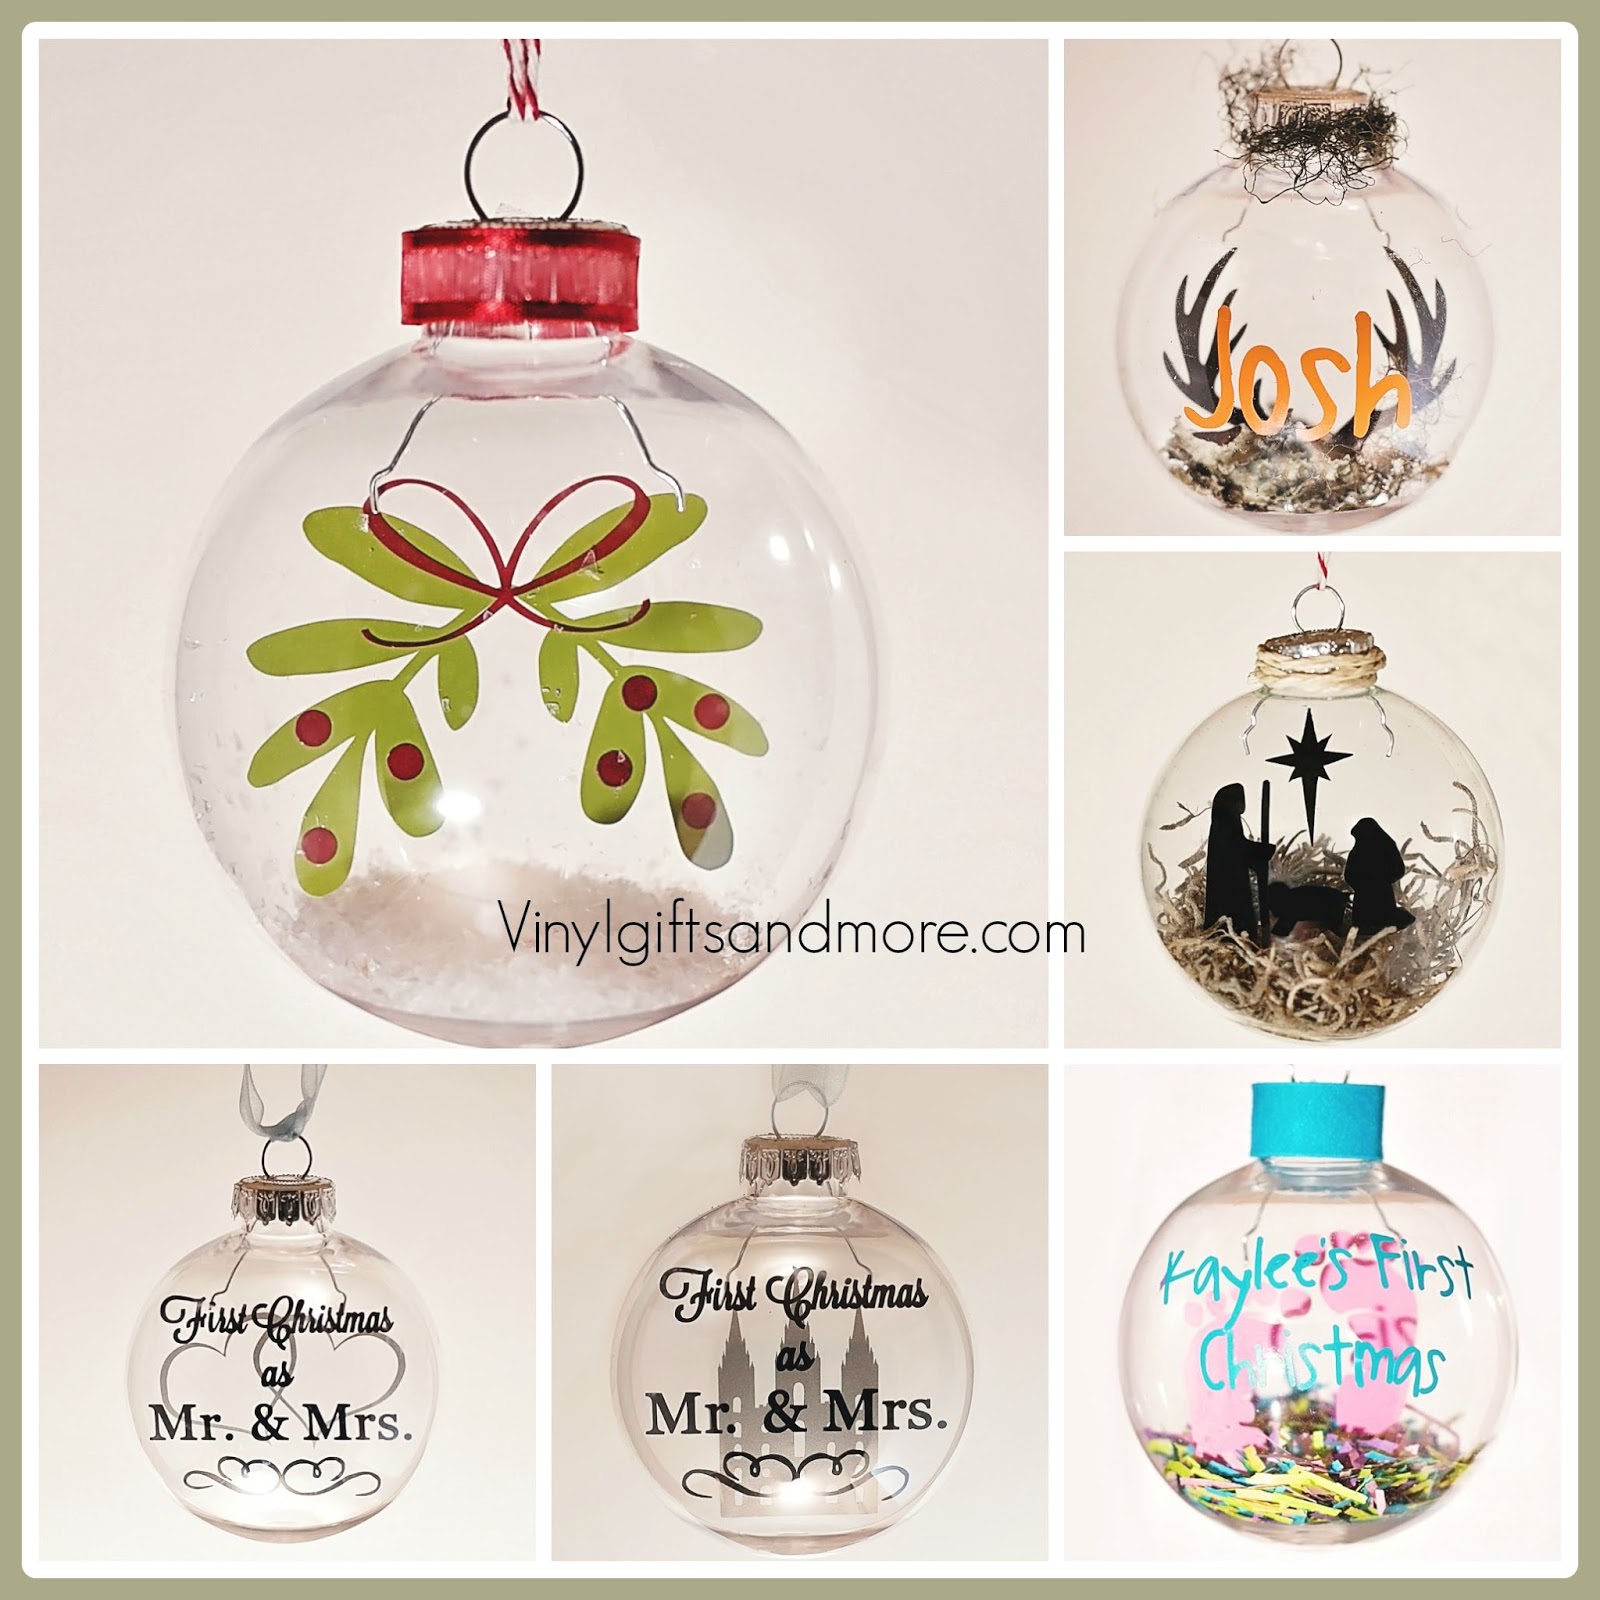
We began buy going to a local hobby store and found some clear glass Christmas balls.  They were on sale so I bought quite a few in 2 sizes.  I tried to find these balls last year but waited too long and they were gone in the stores by the time I began looking.  I understand they may be found in some variety stores also.


We then gathered some supplies - craft paint and alcohol (use Tempra paint not Acrylic). 


Since I am not a craft person, I contacted my daughter-in-law for specific instructions.  She homeschools her children (see her website - Layers of Learning) and they are always doing craft projects. She said her kids did this craft without much help - they were about 10, 7, and 4 when they did this - she also did this project with 3 year olds and it worked.  So I bought these paints and tried this project with some issues (which I will explain later) and when it didn't work right, I called my daughter-in-law to find out why.  The answer:  USE TEMPRA PAINT - Kids washable paint - NOT ACRYLIC!!!  Well, I had used Acrylic paint.  It works but tends to take longer to dry, does not mix well with the alcohol, is too thick, and tends to streak as it dries.

First take off the metal hook from the top of the ball.  (Make sure you have your area prepared for painting as it can be messy depending on the ages doing this project.)  Squirt one to two drops of alcohol into the ornament then squirt the paint (a squirt or two) and swish it around to become a bit runnier.  Swirl the paint around in the ball.  You can use one, two, or more colors.  The more you swirl it around, the more the paint might mix.  Since I don't have the Tempra paint yet, I can't say exactly how this will work but I will be getting some and trying it out and will let you know.

With the Acrylic paint, I had to keep swirling it as it was drying as it started streaking.  As I did this, the color would sometimes change and sometimes blend.  I did a pink and purple that ended up light purple, a blue and green that has one side blue and one side green, yellow and pink that came out more yellow with a hint of pink, and my cousin did a red and green that was green for awhile then turned spotted red and green and ended up red with some flecks.

After the paint dried (and because we are old and impatient, the paint had not yet dried), we applied vinyl designs to our Christmas balls.  I had some of the Jar Lantern designs and tried using some of them but I found that the curve of the ball made it difficult for some so I had to revise some of them for these Christmas Balls.  The designs below will be available on our website (Vinyl Gifts and More) soon.  Look for them under CHRISTMAS ORNAMENTS


Jingle Bells with Polka Dots -  You apply the words then using a craft knife, apply the polka dots around the ball as desired.


Believe with Stars - This is actually the design from the Jar Lanterns pint size - but I had to manually put each letter onto the ball as the curve was too round to apply using the actual pattern.  I used a craft knife, pulled up the letter carefully and placed it on the ball as desired.  I did the same with the stars. I am not very steady with my hands so got it a bit lopsided - oops!


Merry Christmas with Tree and Stars - this is similar to the Jar Lantern in that it has the same design as the words and the tree but we added stars to help decorate the ball and had to modify the size of the letters and the tree. Here is an example of how to apply some of the vinyl to the balls:


Because of the extreme curving, you will need to take more care as you pull off the clear plastic and carefully push down the vinyl to keep it in place.  You also must be careful because the ball is made of glass and can easily break (as my cousin found out).  If your design buckles, you can use your craft knife to slice or poke a hole into the design to let out the air or let it overlap a little.  Our designs will fit the small glass balls (2  5/8").  I will also have designs for the 3 1/4" balls.


Oh Holy Night Manger - This is almost the same as the Jar Lantern Pint size.  I had to cut the cradle and overlap it at the base to make it bend correctly around the ball.  The building part of the design is not there because it would not bend around right.  The words worked fine.  I love it on the blue too!

When you are done, put the metal tab back onto the ball and it will be ready for your tree!

Well, two ole ladies did this project but I kept thinking what a fun thing to do as a family for Family Home Evening or a craft night with the kids.  We will have some more designs available soon (this is our busy season but we will try to get some available). 

Tuesday, July 26, 2011

Christmas Tree Word Art

Here is a fun project to do for Super Saturday.  I just want to thank my sister-in-law Karen for making this graphic and letting us have it.  You are awesome!  This fun graphic was put on a board to hang, but you can put it on a tile, glass block, tin, wood...

NOTE:  When you order any vinyl that you wish to put on a board to hang, please make a note to us under "Special Instructions" so that we will know to cut the graphic a little shorter to allow for the holes and hanging otherwise the graphic may be too large.

 This is an 8x8 MDF board that is 1/4 inch thick.  You can cut your own board, or you can purchase MDF boards through our website vinylgiftsandmore.com.

 Apply the vinyl to the board.  The nice thing about our vinyl is that we use a clear transfer tape so you can see your graphic through the tape and that way you can see where to place it on your board.  (Note:  We off-set the graphic to allow for hanging but you can center the graphic for your 8"x8" wood to use with an easel.)

 Measure your holes (double check your measurements, or you will end up with 3 holes like me. :) and use a drill to drill your holes.  I put my holes 2 inches from the ends.
Tape the ends of your ribbon so you can put them through the holes. Tie a bow and hang. 
Come check out all of our vinyl at vinylgiftsandmore.com

Monday, October 25, 2010

New Graphic

I have had a few emails about our graphics, and how they are not up for sale yet on our site.  I am really sorry about that.  We have been doing lots of orders (Thank you all) and have been really busy.  I am also in the process of moving.  We have moved 7 times in 10 years so I am really excited to own a home and stay put for awhile.  This is a new graphic that will be for sale.  All the trees are separate, so you can use them for all different designs.

Tuesday, October 5, 2010

Merry Christmas

We are excited to have a fun new Christmas graphic.  It should be on our website soon.  I don't know about you, but I can already feel the Christmas spirit in the air.  Maybe it's all the Christmas vinyl I am cutting.  In my town it is over 100 degrees, but I still feel like snuggling under a blanket and drink hot chocolate watching a great movie.

Monday, August 16, 2010

Fun Signs

While I have been enjoying the last few weeks with my children before they head off to school, my mom has been busy making new things for the website. This vinyl is already on our website, but we wanted to show how it looks great on a board with a border around it.
This is a new vinyl graphic that will be added to our website soon. Christmas crafting is on its way, so we are going to be getting some fun new Christmas graphics soon.

Wednesday, June 2, 2010

Let it Snow Vinyl

I know it is June, and we are praying for sun not snow, but I wanted to show these cute little tiles. This vinyl is shown on a bathroom 6x6 tile that we purchased for .38 cents. Got to love that price. This would be a great gift for a neighbor or friend during the winter season. It would also be a fun craft to do at a Super Saturday. You could put it on a wood block and put a ribbon around it and it would be adorable.
This vinyl can be found @ Vinylgiftsandmore.com

Tuesday, May 18, 2010

Believe in the Magic vinyl in Red

My Mom felt crafty today so she made the "Believe in the Magic" in Red. I like it in Red the best, but my favorite color is Red. This vinyl was put on the inexpensive bathroom tile, and it looks great!


Monday, April 5, 2010

The Magic of Chirstmas

It is that time again to start thinking about Super Saturday crafts. It seems like most people like to do Christmas gifts for Super Saturday, so I will be coming up with some fun Christmas ideas. Here is a great saying for a tile. You can also put this on a glass block, wood block, picture frame...

Saturday, November 21, 2009

Advent Calendar


I am so excited for the 1st day of December so I can use my cute new advent calendar. This advent calendar is made of 24 little tins. You can put little treats in the tins everyday for your kids. Way too cute. My kids are already excited. We will also have the vinyl for sale at vinylgiftsandmore.com on Monday.

List of supplies:
-(1) 14 1/2 x 17 inch MDF board 1/4 inch thick: (My board started out being 2 feet by 3 feet. I went to Home Depot and had them cut my board for free. Most lumber stores will cut wood for you.)
(I recommend that you find someone to order these tins with because shipping adds up. They also have a $3.00 fee for orders under $20.00. )
-Red paint
-Ribbon
-Strong Glue
-Drill to drill holes on top
-Metal Scroll (This item is optional. My friend hung her board up with just ribbon and it looked great!)
***The most important is the VINYL. When you order the vinyl from Vinylgiftsandmore.com, you will be getting the circles with numbers for the tops of your tins, and Christmas Countdown for the top of your board.
How to make:
1. Drill your holes on top of your board. (This is for your ribbon to go through so you can hang it.
2. Paint your Board
3. After the paint is finished spray your board with a clear coat to protect your paint. I use matte finish.
3. Apply vinyl on top of your tins.
4. Lay out your tins on your board how you want them.
5.Add the Christmas Countdown vinyl to the top.
6.. Start applying your tins to your board with strong glue. (I used a glue gun because it is quick, but probably not the best to use because over time it will pop off. )
7. Hang your board with ribbon.
8. Hang it in your house so your Children or Grandchildren will enjoy! :)
***We will have these kits ready for 2010 Super Saturdays. Right now for Christmas 2009 we just have the vinyl***

Saturday, October 24, 2009

Wise Men Still Seek Him Vinyl

I am really, really excited about this new vinyl for the glass block. I made some vinyl for a super Saturday a few weeks ago and we asked if we could see some pictures of the finished project. The pictures came, and WOW did they look great. Some people are just really crafty and creative out there. I saw one of their designs and fell in love with it, so I decided to make one for myself. After I made one I showed my mom the picture and she had an Aha moment. The vinyl was placed on velum paper and then the velum was tacked to the glass block. It looks really nice and you don't see the wires in the back. The best thing of all is... you can change the velum for every holiday and only have one glass block. I thought my mom was a genius! So, we are going to get busy and make different holidays for you. Please leave me a comment to let me know what you think about this idea.


How to make this fun glass block. I took a piece of velum from the craft store and cut it to fit on my glass block. I then tacked the corners down with a glue stick. If you want the velum to be permanent on the glass block, I would glue the whole thing down with stronger glue. The wording comes in a straight line, so I cut the vinyl wording so I can put the words on top of each other. I put the wise men, words and the star on the block. Then I was done. You can add lights if you like, but it looks nice without it too.
You do not have to use velum for this project. You can put your vinyl right on the glass if you like.

You can find this vinyl graphic on our website Vinylgiftsandmore.com

Wednesday, October 15, 2008

Wise men for the Glass Block


This is the wise men for the nativity scene. This is also $4.oo each. For 1.00 more I can add on the top "Wise Men Still Seek Him"

Saturday, September 27, 2008

Santa Cookies Vinyl

This could be a fun Christmas gift for friends, family, or neighbors. Having a plate especially for Santa adds to the fun and anticipation of Christmas morning.

The vinyl size is 7" wide x 6" high. If you need a different size contact me. The color for the vinyl pictured is gloss white.

Friday, September 26, 2008

More Glass Block Designs


Here are some more fun images for your glass blocks. I also have the wise men, so you can have a complete manger set.

Saturday, September 20, 2008

Lighted Glass Block


This is another fun idea for Christmas. They are glowing Christmas glass boxes.

All you need is a glass box that you can get at home depot or most home stores. The size that you want is 8x8x3. Next, you drill a hole in the back with a diamond bit hole cutter. 1/2 inch bit works great. You can find these at most hardware stores. I picked mine up for about $7.00. Remember when you are drilling glass use water to cool the blade down and to wash away excess glass. I just used a water bottle, and squirted as I went. Don't push too hard. You don't want the glass to brake. It took me about 3-4 minutes to cut each block. Please be careful when cutting. Use safty glasses, and remember you are dealing with glass. I have made these blocks without the lights, and they look good too. It is just fun to have a glowing box.
Decorate time: Wrap a bow around the block. I got my ribbon at the dollar store. Put the vinyl on the block. Stuff the glass box with a string of white mini lights. About 10-20 lights. Plug it in and you have a wonderful christmas decor.

LinkWithin

Related Posts with Thumbnails